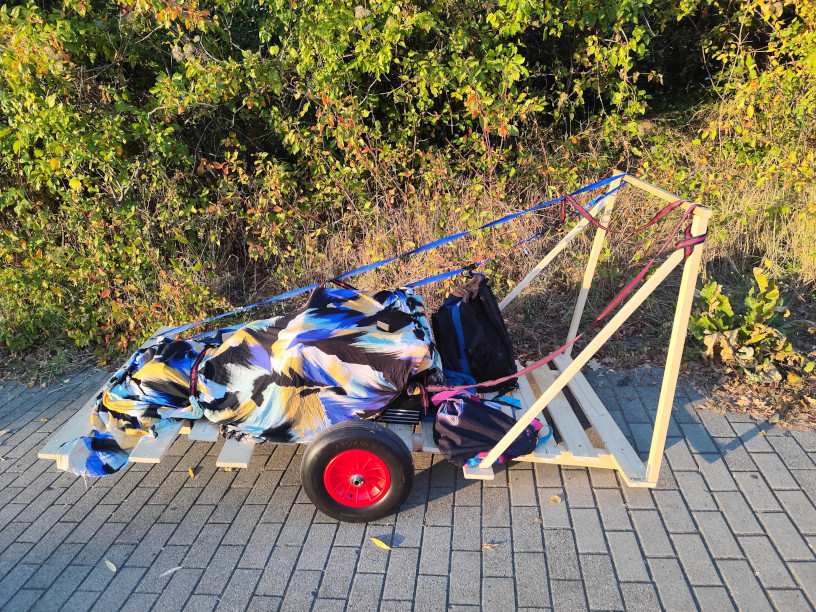
Discovering the handcart
Date: 2026-10-21 01:00Tags: handcart
A few months ago I read this article from Low-Tech Magazine, and for some reason I decided to make one too.
Note: their web server is solar-powered and may be offline during Spanish night-time in the northern hemisphere winter.
For reference here's the one they made and wrote about:
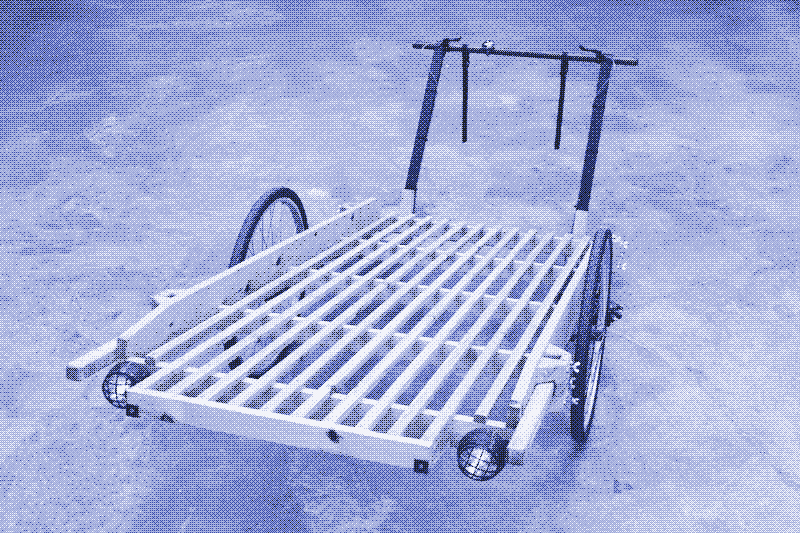
I've copied the general shape of theirs, but otherwise I designed and built mine from scratch using tools and materials I had available.
The very first part I made was the axle. I went to the hardware store and bought their biggest wheels (luckily solid rubber), a circular steel extrusion of the right diameter, and four hose clamps from the plumbing section. I assembled it, with a hose clamp on each side of each wheel, and it sat on my floor for a while, where I'd occasionally playing with it by rolling it around and marvelling at how easily it moved.
Wheels come in two basic types: air-filled or solid. LTN used air-filled bicycle wheels, which I didn't feel was a good idea as I'll definitely find a way to puncture them. They also look rather thin, although I'm not sure how much weight you can safely put on a bicycle. My wheels are quite wide, and because they are solid rubber, they would not be bothered by a nail sticking through them. They are also rather heavy. For the purpose of this cart, they feel pretty indestructible.
The radius, and thus the cart's ground clearance, is about 20cm, which proved to be adequate for most city driving although not quite enough for some of the taller kerbs. I did have to avoid going up tall kerbs but they were never a significant obstacle.
The second part I built was the bed. Looking at the Low-Tech Magazine one, its construction doesn't seem to make a lot of sense as they've reinforced the long direction (which needs to be stronger) on the top layer instead of the bottom. While this makes for a nicer bed, it still doesn't seem to make sense and they've had to use especially tall side rails to increase the strength. In my design I went for a much simpler design: two long structural members underneath support many short members in the sideways direction on top.
I had about 800mm width available between the two wheels. Leaving some clearance, I cut up a pack of 5x2500mm planks giving me 10x750 and 5x1000mm. Instead of cutting them all to 750mm and leaving 5x250mm waste, I chose to leave the long planks long, and place them where they do not interfere with the wheels, providing some more space for whatever future purpose. The extra length turned out to be useful for at least attaching the handle later.
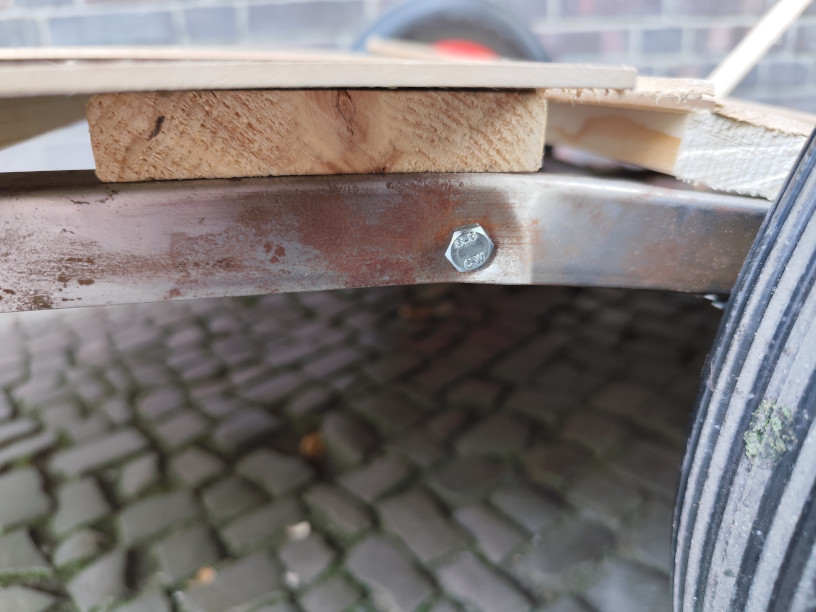
The bottom layer of the bed is where I made my biggest mistake. In my first version of the cart, I used 20mm L-shaped steel extrusions as the bottom-layer structural members. I knew that flat pieces of steel wouldn't work, because they would just bend when asked to carry any meaningful weight, so I chose L-shaped beams instead. I could have chosen box beams instead, but then I wasn't sure how to attach the top-layer planks. With the L beams, I just had to drill holes in one arm of the beam and bolt the planks on, like shown here. With box beams, I would've had to drill both sides and use longer bolts. I also didn't want to insert the bolts or screws from the top side, since I had the idea to make a very smooth surface on which an air mattress could be placed with no fear of puncture. That idea fell apart later.
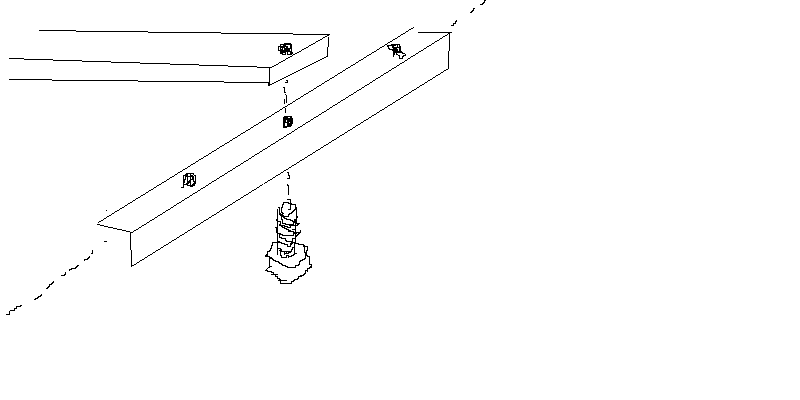
I did use short pieces of box beam to reinforce the middle of the bottom side of the bed, to provide a resting surface for the axle. These were placed inside the cavity of the L-beam, underneath the bolt heads and resting on them, which transferred the weight, and secured in place with some more non-load-bearing bolts.
I knew the box shape would be very strong - my mistake was thinking an L-shape would be half as strong since it has one vertical side. I neglected that the bottom side of a box beam also plays the role of holding the two vertical sides together. Without it, they can easily buckle inwards or outwards, allowing the top side to bend. And when I loaded it up later, that's exactly what happened. And since the part with the box beam did not buckle or bend at all, that tells me it would've been strong enough.
Still following the smooth surface idea, I covered the whole top with thin MDF sheets, as close to a single flush surface as I could make it. I made it as wide as the long planks, except for a cutout around the wheels. This covered up the gaps between the planks.
Lastly I used this kind of metal strip with periodically spaced holes to secure the axle to the bottom of the bed. I cut two lengths about 40cm each (much longer than necessary), placed the axle where I wanted it, formed the strip around the axle and touching the box beams. I marked and drilled holes and screwed in bolts in the closest holes to the axle, as well as the farthest ones which would be some redundancy in case those bolts worked loose and fell out, as well as securing the ends of the long strips.
I realized that when one end of the cart was touching the ground, it was supported by less than a square millimeter of the corner end of one of the L-beams, which is a tiny area that's likely to dig into the floor and damage it, so I added extra planks under the ends to cushion them. I tried a few different ways to attach them before eventually just going to the store to get some really long screws that could reach from the bottom bumpers up to the top layer planks. These screws turned out to be useful in many situations and I should've got them sooner.
The last main component of the cart was the handle. I knew the handle didn't need to transmit a lot of force, unlike the bed and the wheels, so I made it haphazardly from some long wooden sticks. There's not very much to say about it. Exactly as described by Low-Tech Magazine, if the weight is balanced and the cart has momentum, it doesn't take much force on the handle, but "not much force" isn't the same as "no force" and I still had to add diagonal bracing.
When the cart is parked it naturally tilts one way or the other, which may be undesirable. The LTN cart has some complicated parking stands. I tried something simpler—using wooden offcuts to make a U-shape that fit into the slots created above the bumper planks. (Or underneath, but then it was too high). This was alright but still couldn't stand much weight because of course a U shape has substantial shearing forces.
First and second trip - a failure
My first trip was carrying a bunch of wheeled suitcases and my PC to a new living place, about 2km away. But the moment I put any load on the ends, they permanently bent downwards with the sides of the L extrusions buckling outwards. I could bend them back upwards so they wouldn't touch the ground and interfere with movement, but they wouldn't hold load. I muddled through this trip, taking off the wheeled suitcases to move separately, and making a silly tower of load directly above the axle, and got there in the end, but this was a complete failure. I also had to be pulling up the handle most of the way to help support the back half of the bed (as the bed would not), which was very tiring. I did this at night so there wouldn't be people around.
Another unexpected small issue was that there's no fence around the wheels; non-rigid loads tended to touch the wheels and rub against them, adding friction.
When I brought it back, unloaded, in the daytime, it was easy and fine.
In preparation for the second trip, I put spare castor wheels underneath the front bumper plank and screwed them in with short screws.
I also screwed in some more unused wooden beams anywhere that was possible and vaguely made sense, but it didn't end up helping much. Now I had a different problem: basically no ground clearance at the front end. Near the beginning, some restaurant owner thought I was homeless and about to camp in his terrace space, but after that was cleared up, he showed me how to tie some straps to help pull the front end over kerbs.
About 20% of the way through this trip, I ran over a manhole cover and one of the caster wheels broke off. Since I was afraid of that, I had screws and screwdrivers at the top of my stack and managed to repair it. Surprisingly, it then held until 90%, when I went over a tall kerb, and it broke at about 95%, and I couldn't fix it. Fortunately, as I only had a few hundred meters left to go, I was able to pull it the rest of the way by the strap.
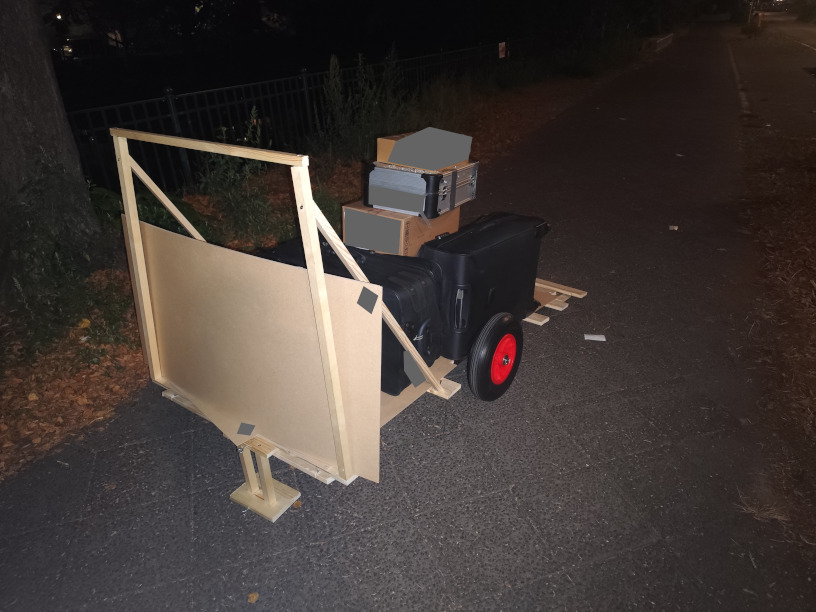
Here's a picture of the cart in a relatively unbroken state, with the parking thing inserted:
Here's a close-up of the buckling, if you didn't grok the textual description earlier:
So obviously, after this massive failure, I abandoned the whole project. No, just kidding, I fixed the problem.
Version 2
For the second version I obviously had to fix the weak part. I removed the axle and wheels, and the handle. I went to the hardware store (a different one, this time) and chose some 38x58mm unfinished wooden beams. I cut them to length, laid them out at a slight angle to provide a little geometric stability against staircasing because why not (even though that had never been a problem), and screwed them into my top-layer planks. Then I removed the metal L-beams, and reattached the wheels and handle.
I also removed the MDF sheeting on top, because it had been all messed up by the bed flexing and I'd thrown away my air mattress anyway (as it got punctured) so there was no more plan for a smooth surface. Not before cutting out the built-in air pump, though—maybe that'll get used in a future project. I was surprised by how simple the pump's design is.
I also threw away the (now broken) U-shaped end holders, in favour of just carrying some right-size wooden pieces and screws and a screwdriver to attach them with. It's not quick to park or unpark the cart using this method, but it works without falling apart.
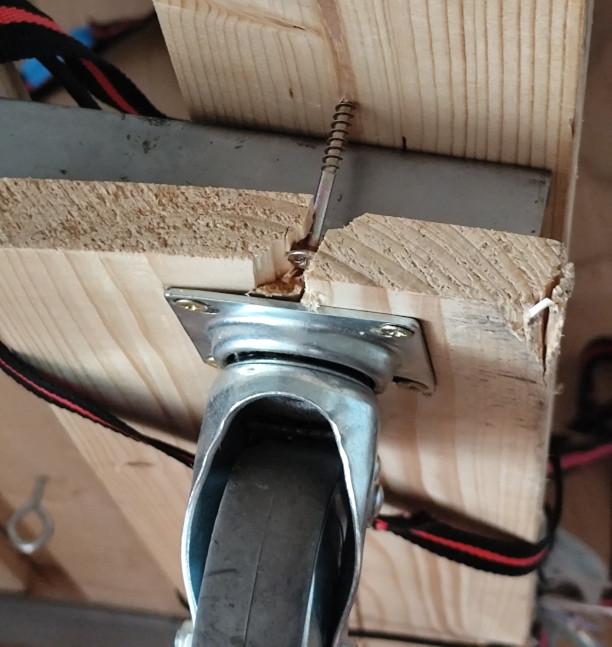
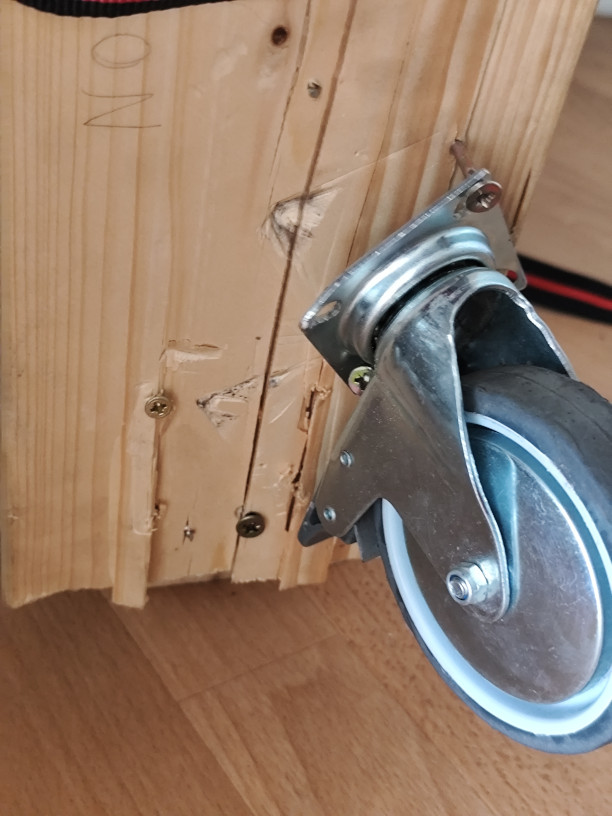
The bumpers were no longer needed so I took them off. The front bumper in particular (with the casters) was surprisingly broken and dented and cracked and cannot be reused.
Here are some pictures of that:
As a side effect of the new bottom beams, I can use them as handles to carry the (empty, handle-less) cart up and down stairs.
Third trip - a success
I loaded my PC and some bags of snacks onto the upgraded cart and I used it to move about 10km to a demoparty (specifically Deadline).
Now that it wasn't trying to fall apart on me, it was actually a dream to use. I can move it about as fast as I can walk, because it supports the weight for me and has good momentum.
Being about 1 meter wide, it fits almost everywhere that pedestrians can go. There was one time that it was a tight squeeze between some bollards, but the bike lane had a wider gap.
At one point I passed a husband and wife carrying crates of empty beer bottles back to the brewery for a refund, and I gave the husband's crate a lift, but the wife still wanted to carry hers, and he commented about German engineering standards, but I think this project represents New Zealand engineering standards quite well!
There was basically no problem pushing this cart 10km to the party, or back afterwards—it just took a long time. Because I was being overly cautious in giving priority to other traffic, sometimes I had to wait a long time for a busy driveway to become clear. There was one stretch through an industrial area where the footpath was unsuitable because it was too high and was frequently interrupted by un-cut kerbs and by lamp posts, and I theoretically had to share the road with industrial trucks and tankers. Since I arrived at the party late on Friday night, I only ran into one lorry along that whole stretch and waited on a side road for it to get past, but when I left on Sunday afternoon, it was busier and I had to take an alternative route.
I was pretty sure the presence of the cart would be accepted at the party and I was right, I parked it out of the way and nobody cared. I showed a few people it, who were generally impressed. I also brought a sleeping bag so I could sleep on it, and fabric to cover the cart and make a little tent. Although the little tent part didn't work it wasn't really important. Wish I'd remembered to bring a pillow though. Odd sleeping arrangements are very common at demoparties. In fact the first time I was at Deadline I actually brought my tent from CCCamp.
It seems the vibration broke my PC and I had to borrow someone else's at the party. Very unfortunate. However this was more to do with the PC than the cart, as it doesn't present any excessive level of vibration. It worked again a few days later, after I reseated the CPU.
Here's a picture of the version 2 cart happily carrying stuff: